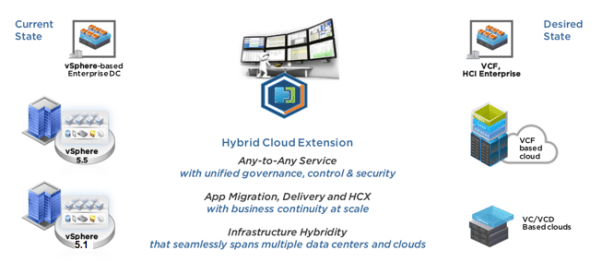
Cloud Providers with the VMware Hybrid Cloud Extension (HCX) service can provide customers with a true hybrid cloud experience for workload portability, agility, disaster recovery and business continuity. Cloud Providers can take the lead with hybridity, abstracting customer on-premises and cloud resources as one seamless cloud. No changes are required on the source network infrastructure, eliminating complexity for tenants of the cloud platform.
HCX provides the following features:
- Infrastructure Hybridity
- Migration
- Business Continuity/Disaster Recovery
- Data Center Designer
Notes: HCX service also available for VMC as the target; in VMware Interoperability Matrices website, HCX support the following vCloud Director versions as the target:

Why not just use Cross-vCenter vMotion for the live workload migration?
- ESXi vMotion kernel IP can’t overlap between sites
- The source and destination ESXihost must be version 6.0 or later.
- The source and destination vCenterServer must be version 6.0 or later
- Both vCenterServers must be time synchronized for correct Single-Sign-On token validation.
- When executing Cross-vMotion via the vSphere Web Client UI, both vCenterServers have to be in the same SSO Domain.
In the HCX site-to-site Architecture, the HCX Managers have a Source or Destination type. HCX Enterprise Manager is always a source type, and HCX Cloud is always a destination type. Same types cannot be paired with each other.
In the HCX for Cloud Service Providers model, the CSP deploys HCX Cloud. The tenant deploys HCX Enterprise on premises.
In the NSX Hybrid Connect model (HCX for Private Cloud), the tenant deploys both source and destination HCX Managers.
This blog will walk you through the HCX Cloud Manager deployment model as the vSphere destination cloud type (Cloud vSphere) which your vCenter Server is hosted in Cloud Provider’s datacenter for example.
Cloud Provider HCX Setup (Cloud vSphere)
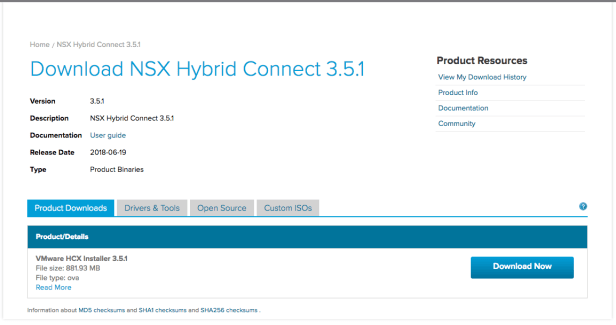
first you need to download the “NSX Hybrid Connect” ova from my.vmware.com
Deploy the ova using vSphere Client in the Cloud side, give it a name and specify an IP address, here my case is hex-mgr-01b, and the IP is 192.168.210.91
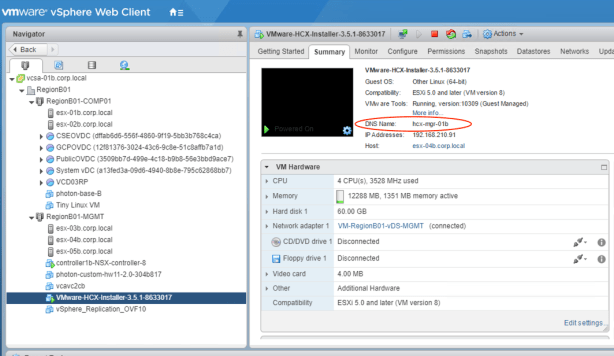
Login to the VM we just created by using the url https://hcx-mgr-01b:9443

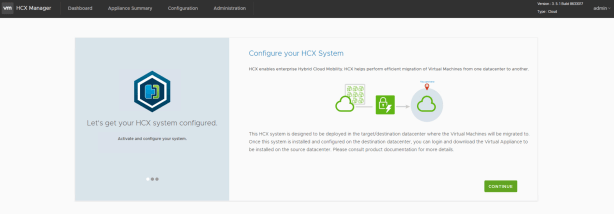
Now the system will guide you through the initial HCX manager configuration steps:
 Activate your HCX Instance by entering the NSX Data center Enterprise Plus License Key and click Continue:

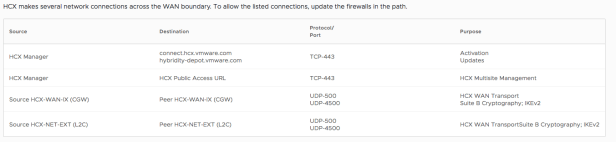
Also if you like, you can configure your proxy connection settings to https://connect.hcx.vmware.com, this HCX server is for license verification and system update purpose only. In the user guide, you can see the perimeter firewall requirements below.
After clicking the “ACTIVATE” button, the system will do some upgrading tasks automatically.
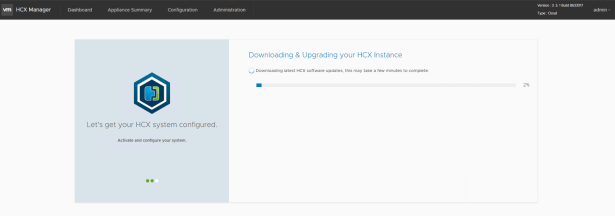
After serval minutes, the system will reboot and we can login again to the HCX Manager again.
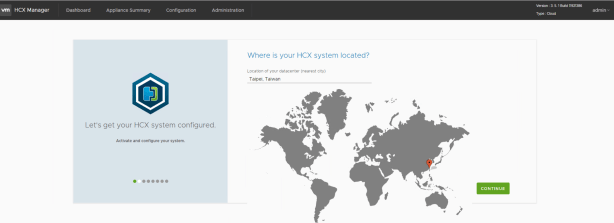
Specify your HCX Cloud location, and click “CONTINUE”.
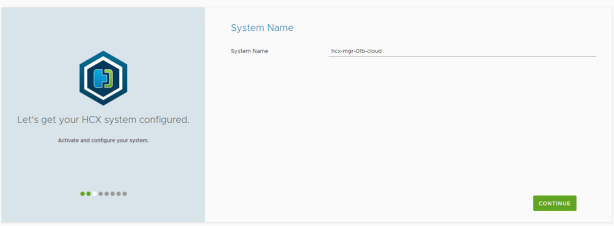
the system will automatically fill in the System Name field with a “cloud” as a postfix attached with the hostname.
Select HCX instance type, here we can choose the vSphere type or vCloud Director type, we choose the vSphere type, I’ll showcase the vCloud Director type in other blog post.

Input vCenter Server and NSX Manager login credentials.

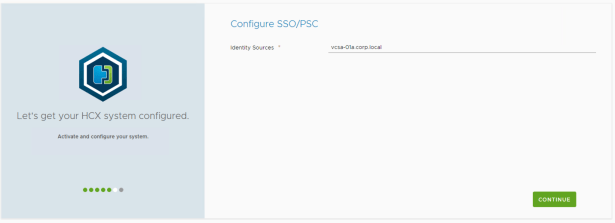
Keyin SSO/PSC informaiton.

-
The remote site NSX Hybrid Connect (HCX) Management VM requires a private IP address for the management interface.
-
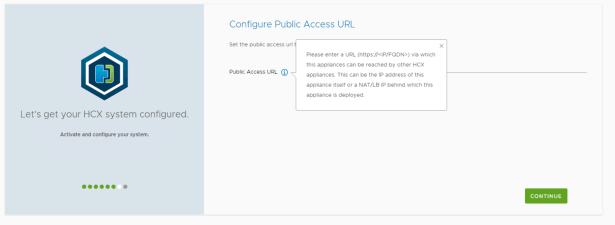
During Initial Configuration, a Public Access URL is configured for the HCX component. If connections to the Public Access URL will be over Internet, a public IP / external address will be required.
-
A Destination NAT or Reverse Proxy configuration may also be required for translating the Public Access URL’s external address to the management interface internal address.
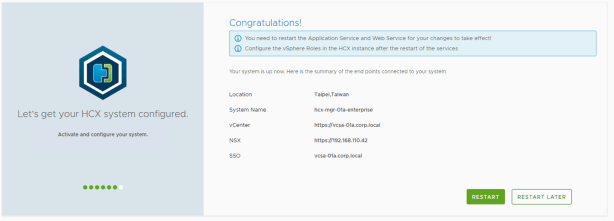
Click “CONTINUE” button.
Click “RESTART” button.

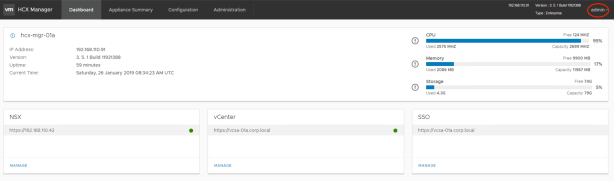
After restart, the system will show the following content.
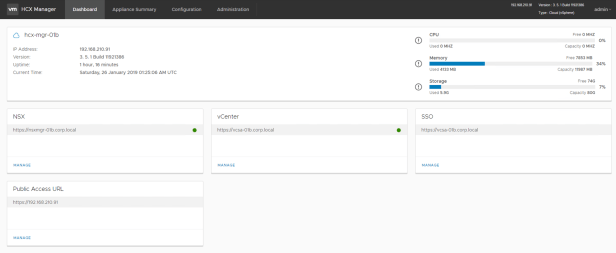
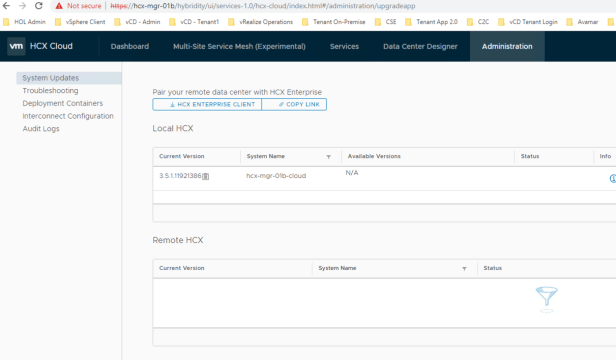
Click the “Appliance Summary” tab to check the detail setup information.

Click the “Administration” tab to check the detail version information.

Now we can login to HCX Cloud Portal by logging into the public IP/FQDN we specified earlier in HCX system (same as HCX manager).


Create Interconnect Configuration
According to the user manual, before tenant can deploy HCX Interconnect appliances in their On-Premise environment, Cloud Provider need to configure the “Interconnect Configuration”, this is to prepare the different backend HCX networks which HCX Interconnect appliance can connect to.
The HCX Interconnect service appliance provides replication and vMotion based migration capabilities over the Internet and private lines to the target site whereas providing strong encryption, traffic engineering, and virtual machine mobility.
-
Management
-
HCX Interconnect appliances use this interface for communications with the vSphere environment.
-
-
vMotion
-
HCX Interconnect appliances use this interface for vMotion communications with the hypervisors. This interface type should always be used when the vMotion network is not routed.
-
-
Internet/Direct Connect
-
HCX Interconnect appliances will use this interface for WAN-bound encrypted communication with the remote site/peer HCX Interconnect appliances.
-

Select storage placeholder.

Define the LAN and WAN networks that HCX will use when deploying Interconnect appliances.
Specify the management interface, the interface connected to the selected network is used for management of the appliance , for HCX internal communications, and for the migration protocols. (ESXi management network is preferred)

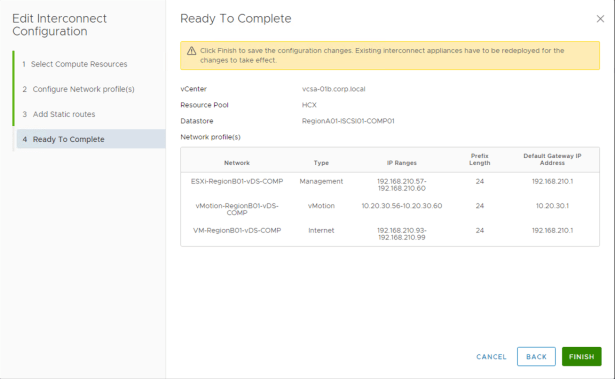
Configure Network profiles.

You need to specify the WAN facing networks type for LAN to WAN uplink connection.

Review all the configurations and click “Finish”.
You’ll see the configured information showing up in the “Administration” tab.

Tenant On-Premise HCX Setup
Before you can perform the pairing of your On-Premises vSphere Instance with the Cloud vSphere Instance, you need to deploy an HCX Manager within your tenant On-Premise environment.
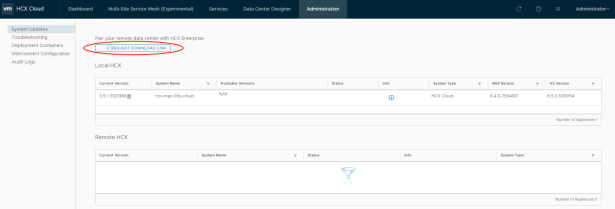
First go to HCX Cloud to request the HCX Enterprise download link.
Download the HCX Enterprise ova or copy the link for the use of deploying from the link.
Input the license key and click “ACTIVATE” button.

You’ll see “enterprise” will be added as the postfix name in the System Name field, click “CONTINUE”.

Now we have activated the HCX, click “YES, CONTINUE” button to continue the setup.

Now you need to connect this HCX manager with your On-Premise vCenter Server, you can see that to connect the NSX is optional.

Input SSO/PSC information.
Restart this service.
After the restart, system will bring up the following content.
Configuring the HCX WAN Interconnect Component
Before any migrations can be done you will need to register the Public Cloud instance with the HCX Manager.

Click on Register new Connection. (you may need to import the remote HCX Cloud’s certificate to the On-Premise HCX Manager’s trusted CA certificate in the HCX Manager Administrator’s tab)

Register a new connection to the remote HCX Cloud site.

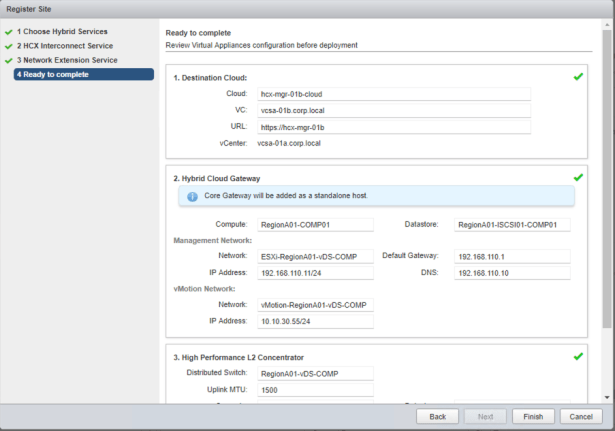
After you successfully registered the remote site, you can now choose which services you’d like to enable.
Please make sure you have enough compute capacity for these services/VMs.


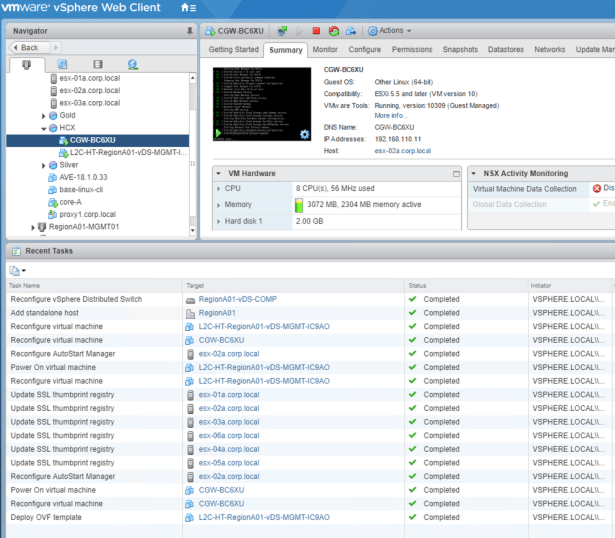
The gateway appliance’s name will be generated automatically, here I have my DNS configured for this name (CGW-BC6XU).
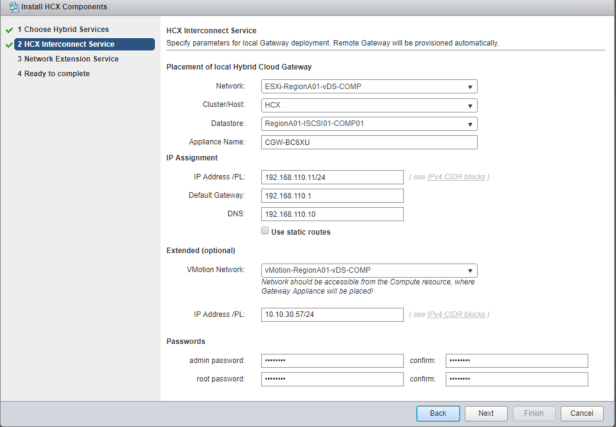
Input network extension service information.

Make sure you have set the DNS public address record for the Cloud host (example here is “hcx-mgr-01b-cloud”)
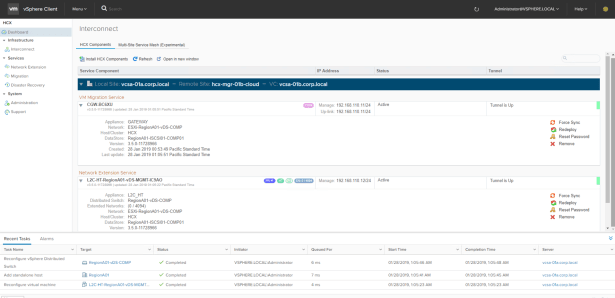
Check the Interconnect status after the site paring, if everything configured correctly, you will see the tunnel status are all in green color and showing “Tunnel is Up” information.
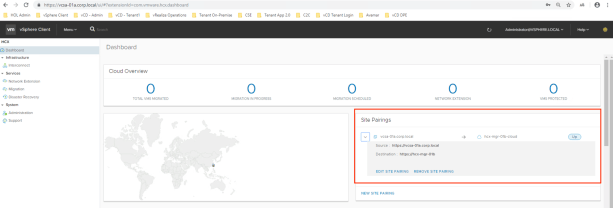
Click on the left-hand side “Dashboard” item to check the site status is “Up”.
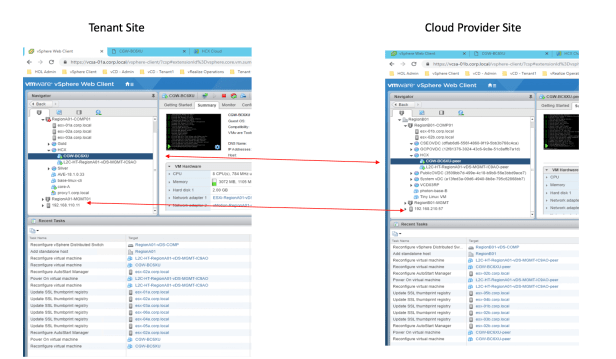
In your On-Premise, you can see there are VMs created for the HCX to work with the Cloud side.
Following is the VMs mapping between On-Premise and Cloud, those VMs are all automatically created after the site paring processes.
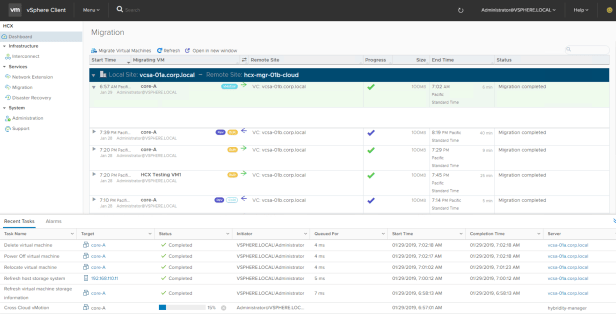
And now you can start to migrate/vMotion or reverse migrate/vMotion (you don’t need to add the extended network at this point to do the vMotion) your VMs from On-Premise to the Cloud Provider’s DC, I’ll introduce the processes in my separate blog.
You can see the small colorful icons in each row which come in very handy to tell what operational tasks have been performed!
The following steps are already well explained in VMware’s HOL guide here, starting from page 31 onward in the HCX site paring session.
Notes:
