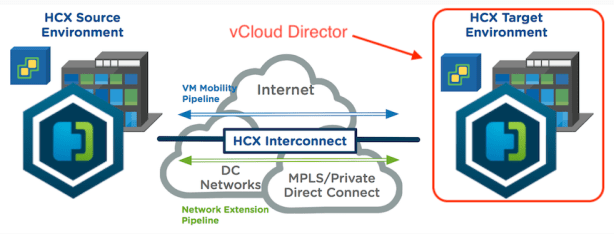
This blog provides an overview of the HCX installation flows for vCloud Director based Clouds.
Before you start to install HCX Cloud Manager in the destination environment, please check here to examine you’ve met all the system, software, license (for Activation), Network Port/Protocol requirements,
The overall HCX solution installation steps include the following:
- Prepare the deployment configurations using the HCX Pre-Install Checklist. (should be provided and completed with the VMware technical support team)
- Download the HCX Installer for the destination site first. You can follow the steps here.
- Deploy HCX Manager in the destination environment using the HCX Cloud Manager OVA.
- Activate and Configure the HCX Cloud system.
- Prepare the destination site’s HCX Cloud system for Interconnect Deployments using the Multi-Site Services Mesh. Define Compute and Network Profiles.
- Deploy HCX Enterprise in the source environment using the HCX Manager Enterprise OVA.
- Activate and Configure the HCX Enterprise system.
- Pair HCX Enterprise with the HCX Cloud.
- To deploy the HCX Interconnect, enable HCX services at the source site with the Multi-Site Services Mesh.
- Testing Migration and vMotion from source to the Cloud.
We need to finish the above 1~5 steps to complete the vCD HCX Cloud site setup.
Prepare the deployment configurations
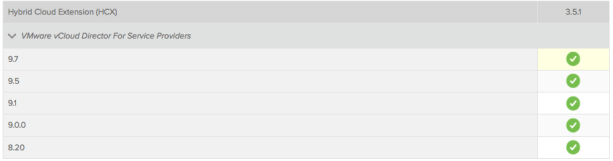
- Check vCD and HCX compatibility status in the VMware Product Interoperability Matrices.
- HCX Activation Keys
- NSX-V is required on the Cloud side (version 6.4 is required)
- DNS/NTP servers
- Free IP addresses available for Management/vMotion/WAN(uplink) configurations
- vCD notifications configured
- vCD AMQP enabled
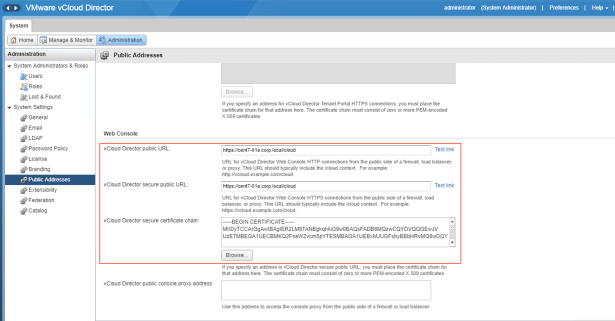
- vCD public addresses set correctly
Deploy HCX Manager
According to the VMware official documentation:
The HCX Cloud Manager OVA is used when deploying HCX at the destination site.
Use this procedure to download the HCX OVA when the destination environment is vCenter Server or vCloud Director-based private installation.
Procedure
- Navigate to https://downloads.vmware.com.
- Search HCX.
- Click VMware NSX Data Center for vSphere.
- Click NSX Hybrid Connect 3.5.1.
- Click Download Now.
Results
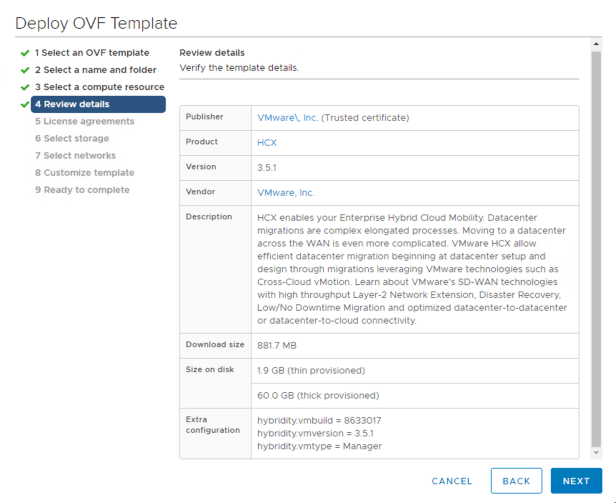
The installer file is called VMware-HCX-Installer-3.5.1-8633017.ova, and has a release date of 2018-06-19. This installer is the latest. It updates itself to the most current release during the initial configuration.
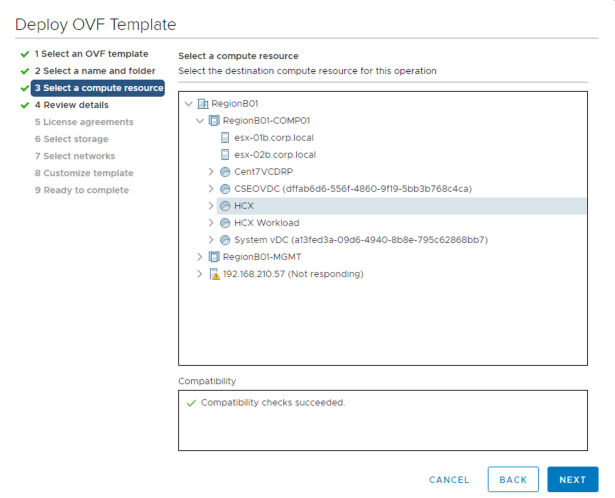
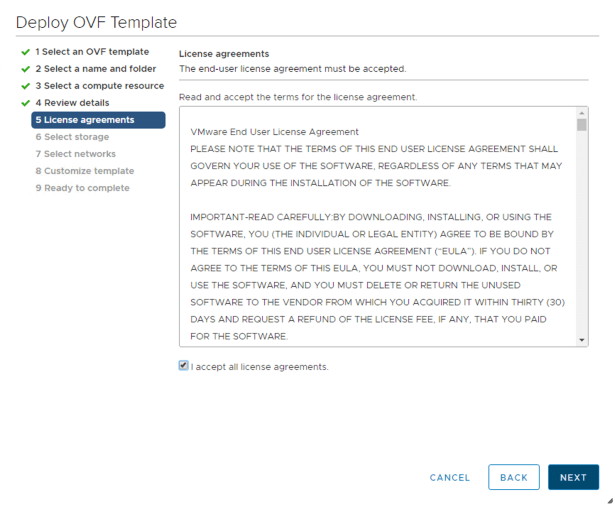
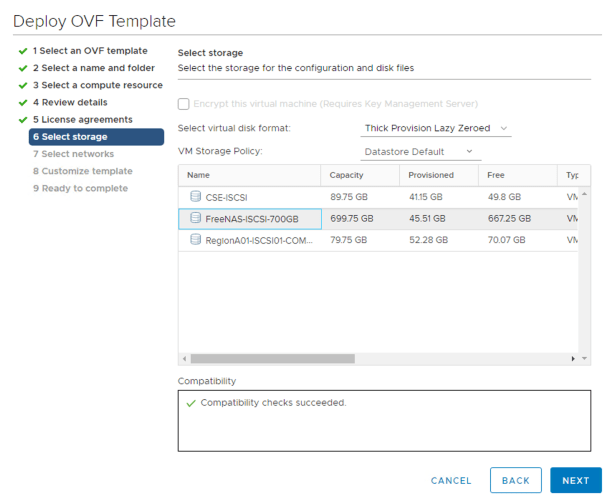
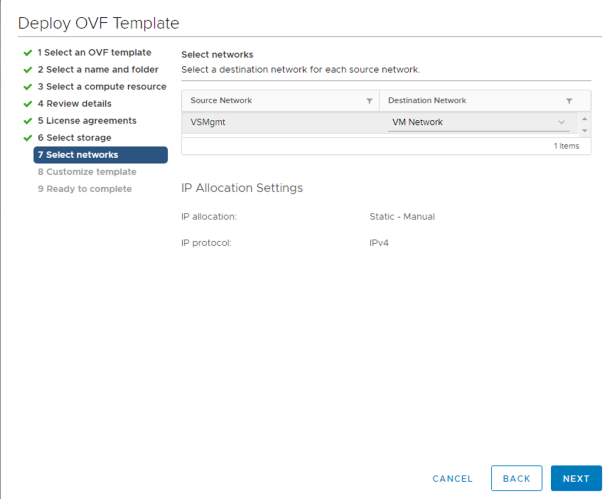
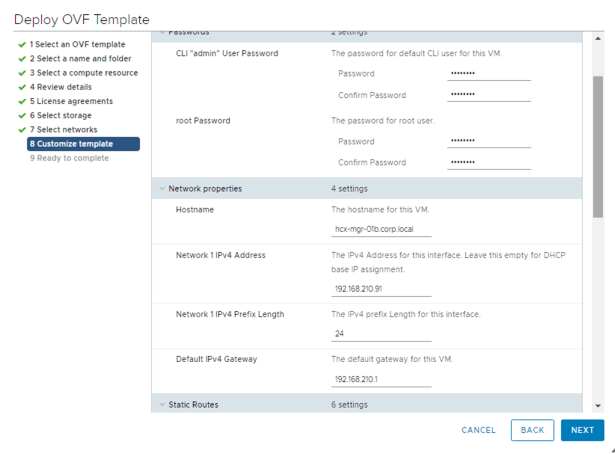
Deploy HCX manager by using vSphere Client or Web Client.

Specify HCX Cloud Manager host name and IP address.
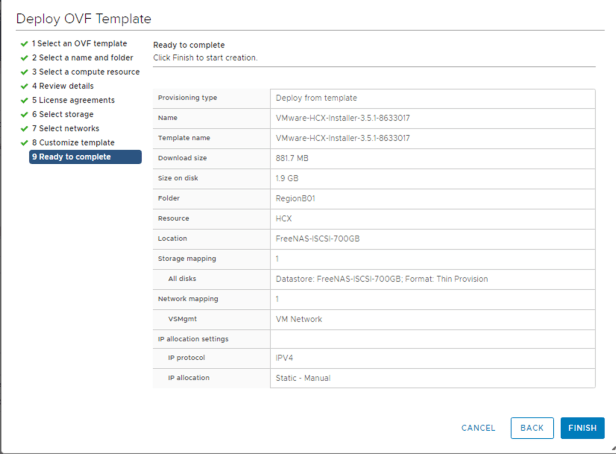
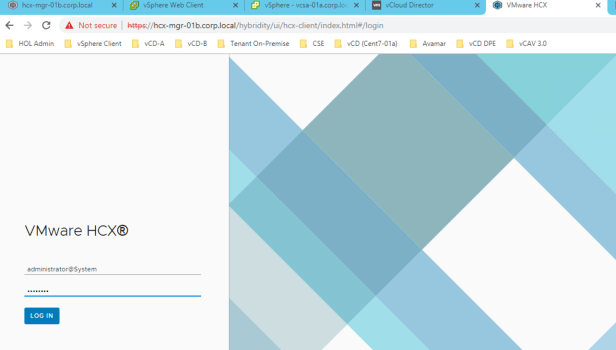
After click the “FINISH” button, when the deployment is successfully completed, you will see the following HCX Manager login screen showing up for you to initiate the configuration tasks.

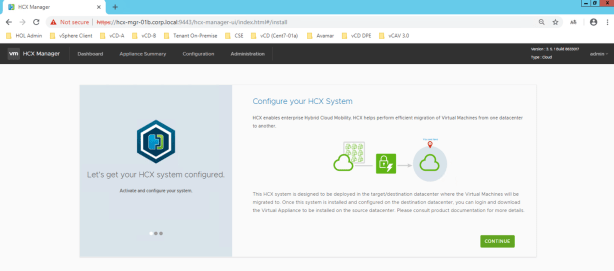
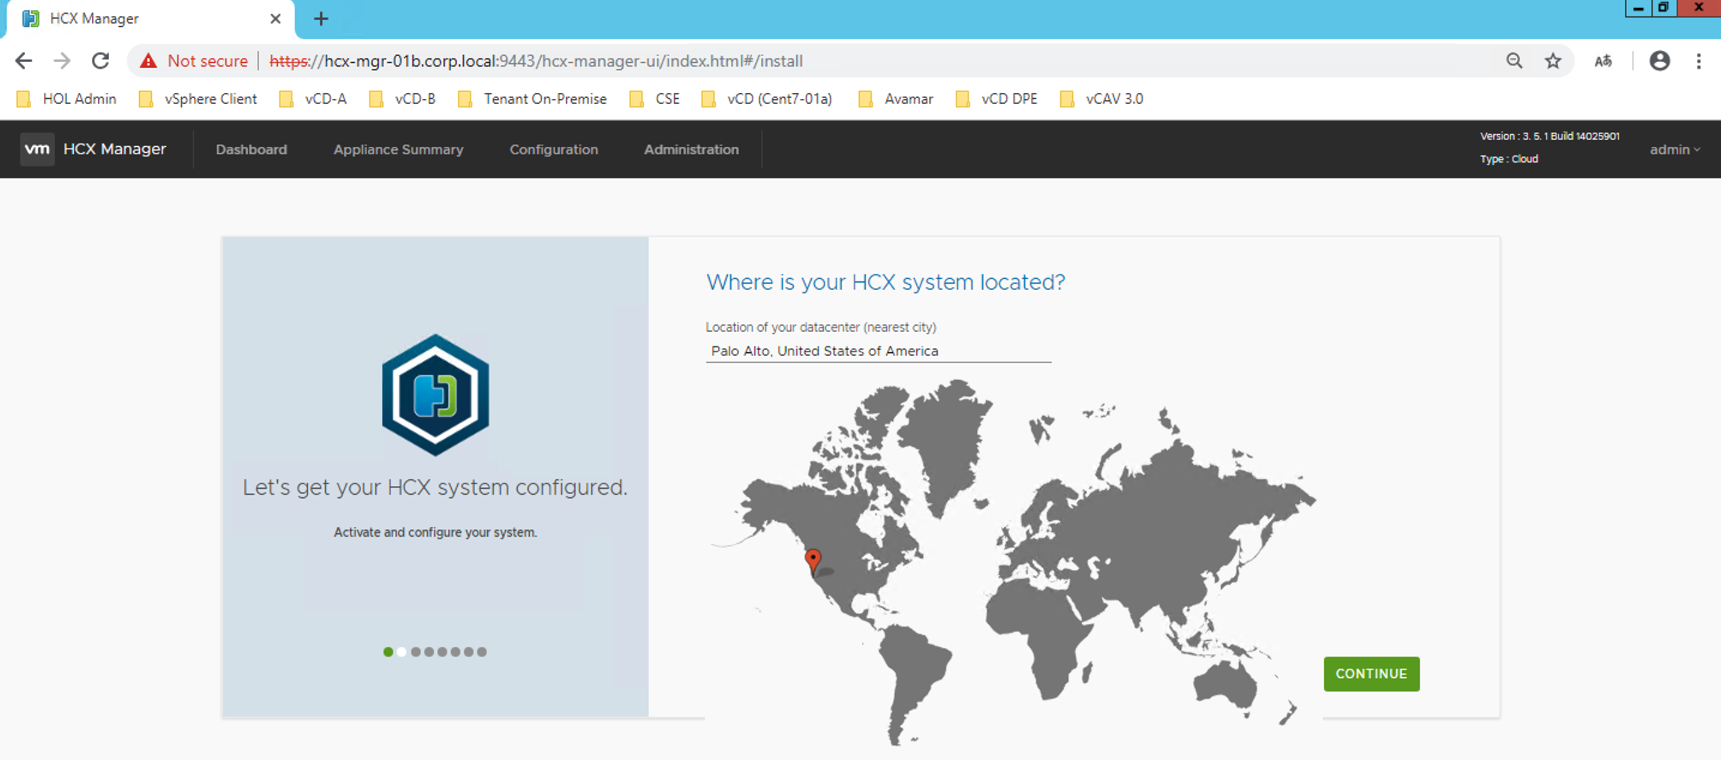
Activate and Configure the HCX Cloud system
During this step, select vCloud Director as the installation type and select the additional vCloud Director-specific details (for example, Public Access URL, AMQP).
First use “admin” ID for the login.

Click “CONTINUE”.
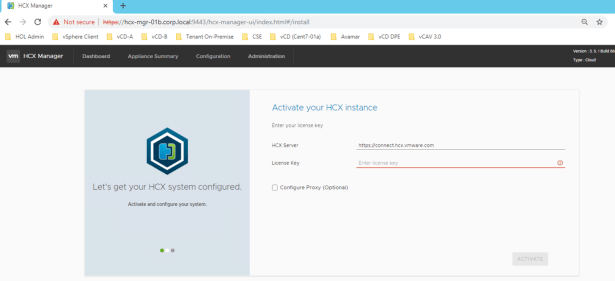
Input your license key to activate this system, normally for the testing or POC, you can use trial NSX-V Enterprise Plus license key, for the production setup, please contact your VMware VCPP account representative for this.
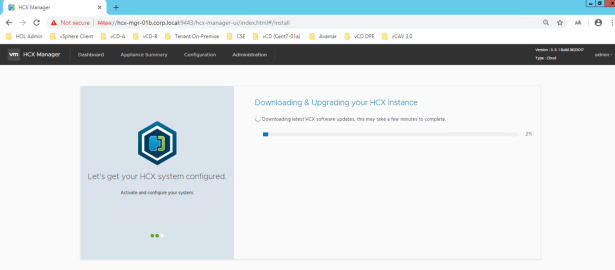
After you click the “ACTIVATE” button, you will see the appliance will automatically connect to the Cloud HCX Server, download the latest HCX software and update the system.
When finish the above step, we will see the HCX Manager login screen again, use “admin” to login the system.

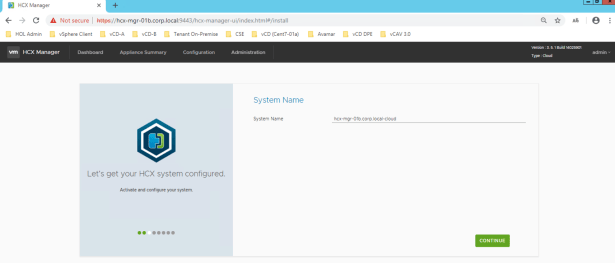
Follow the configuration wizard to complete the setup.
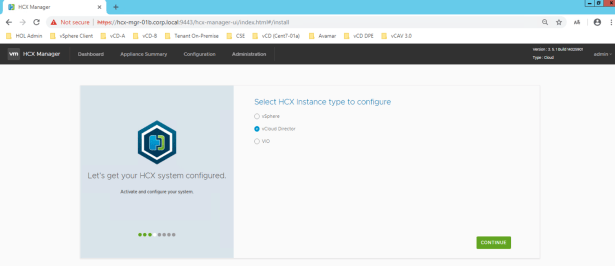
Select “vCloud Director” as the configuration type.
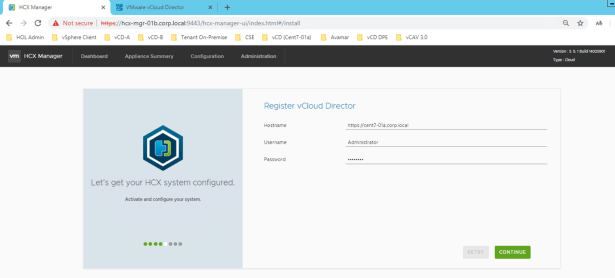
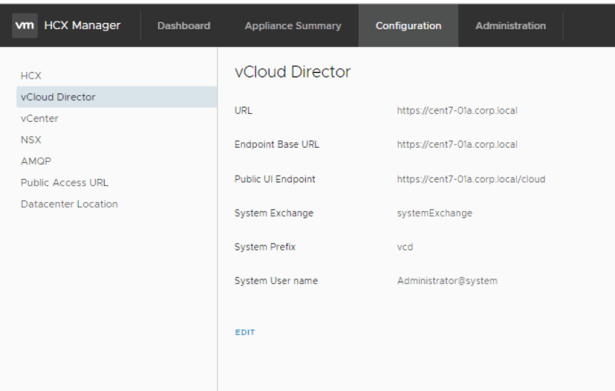
You input vCD hostname url and username information here, use Administrator@system as the username.
Notes:
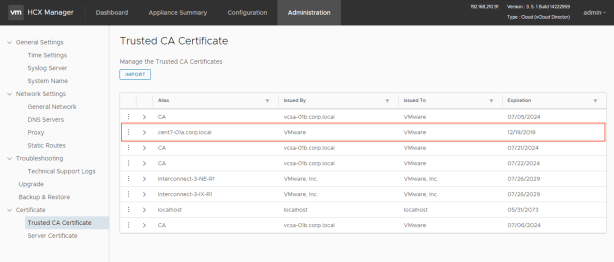
Please make sure you have add the vCD certificate as below:
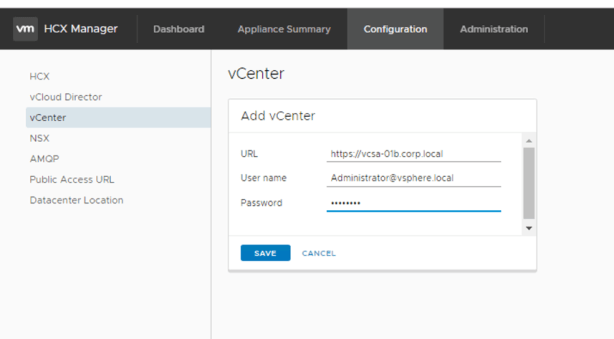
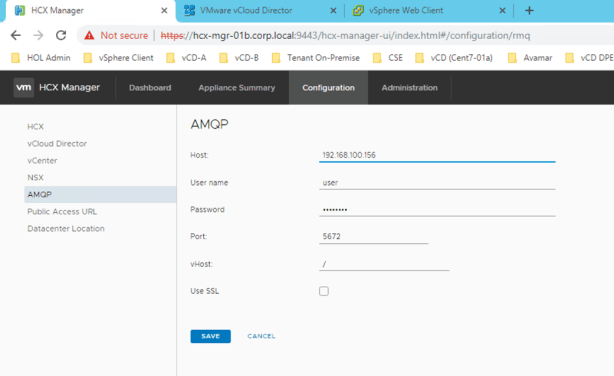
You can continue to input vCenter/NSX/AMQP information using the step-by-step wizard tool or you can go to the “Configuration” tab in the main webpage to configure those separately.
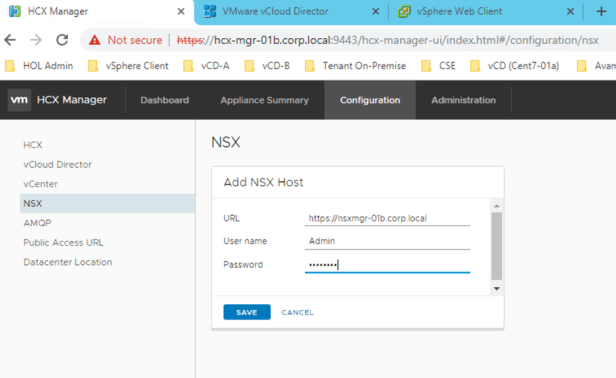
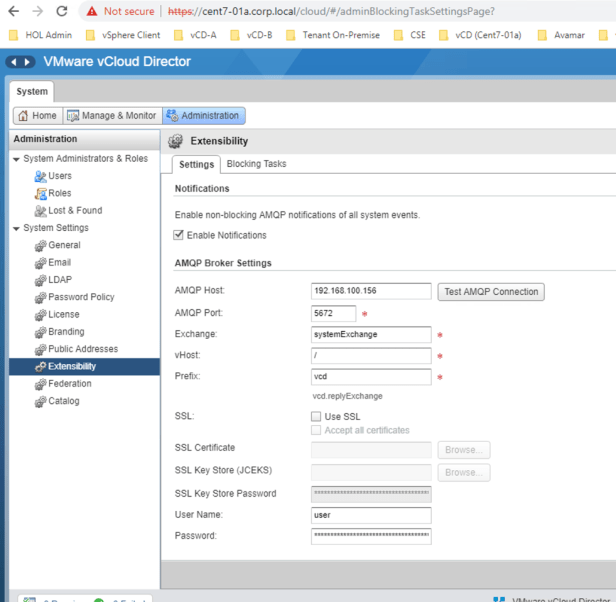
Input AMQP related information, these info can be referenced from vCD. Please note that you need to tick the “Enable Notifications” checkbox for this setup to function correctly.
After complete all the required connections to the supporting VMware SDDC resources, restart Web and Application Services.
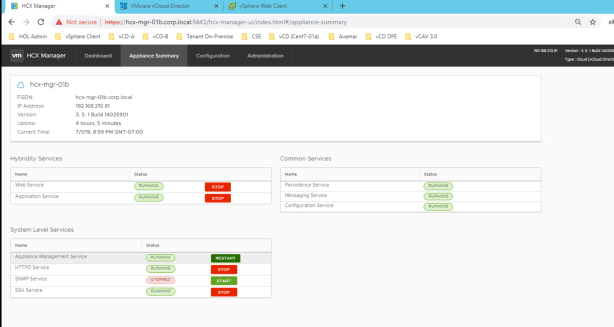
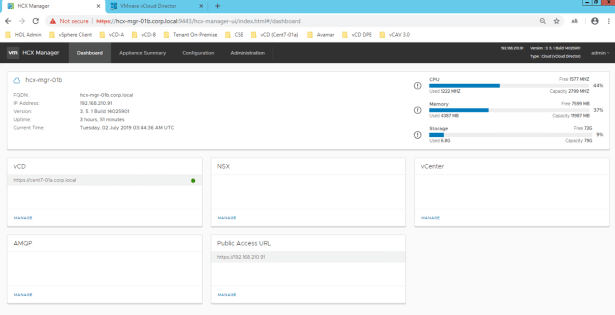
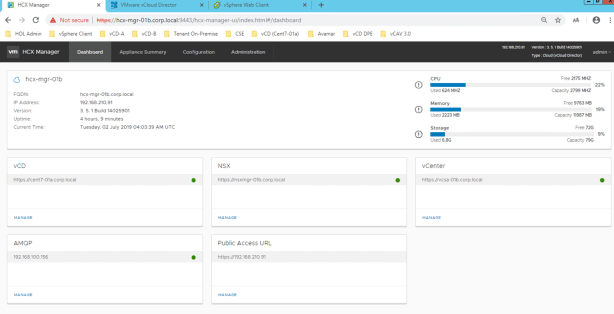
You can see some green lights showing up in the page if everything is correctly configured.
Configuring and Managing the HCX Interconnect with the Multi-Site Services Mesh
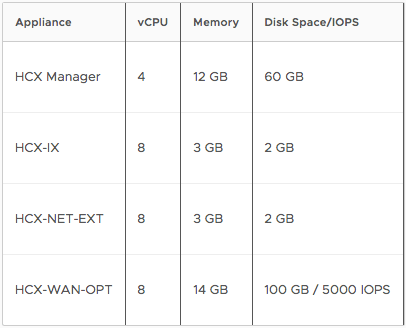
Make sure you have enough capacity for the following appliances to be created in your environment.
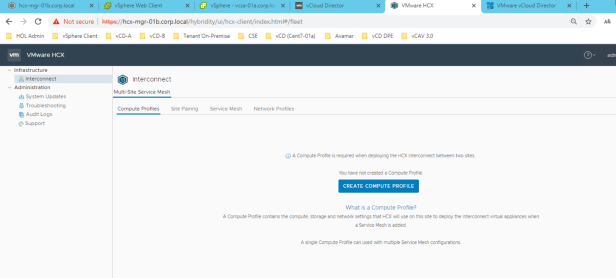
First we need to create Interconnect Multi-Site Service Mesh Compute Profiles.
Make sure you have imported vCD certificate into HCX Cloud Manager:
Login to your HCX Cloud Manager, https://<HCX Cloud Manager>:443
click the “Interconnect” icon on the left-hand side of the login page.
First we need to create Interconnect Multi-Site Service Mesh Compute Profiles.
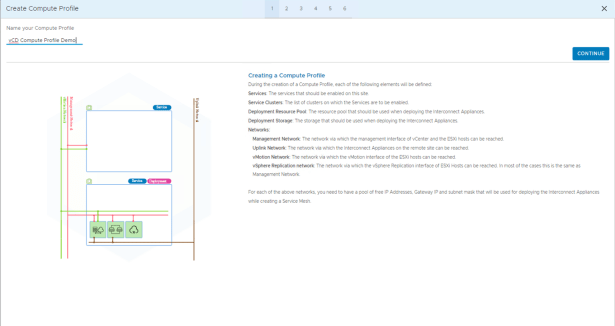
A Compute Profile contains the compute, storage and network settings that HCX will use on this site to deploy the Interconnect virtual appliances when a Service Mesh is added.
- Creating a Compute Profile
During the creation of a Compute Profile, each of the following elements will be defined:- Services: The services that should be enabled on this site.
- Service Clusters: The list of clusters on which the Services are to be enabled.
- Deployment Resource Pool: The resource pool that should be used when deploying the Interconnect Appliances.
- Deployment Storage: The storage that should be used when deploying the Interconnect Appliances.
- Networks:
- Management Network: The network via which the management interface of vCenter and the ESXi hosts can be reached.
- Uplink Network: The network via which the Interconnect Appliances on the remote site can be reached.
- vMotion Network: The network via which the vMotion interface of the ESXi hosts can be reached.
- vSphere Replication network: The network via which the vSphere Replication interface of ESXi Hosts can be reached. In most of the cases this is the same as Management Network.
- For each of the above networks, you need to have a pool of free IP Addresses, Gateway IP and subnet mask that will be used for deploying the Interconnect Appliances while creating a Service Mesh.
Follow the step-by-step wizard to create the “Compute Profile”.
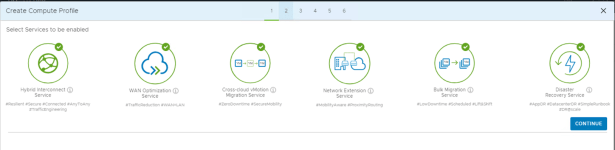
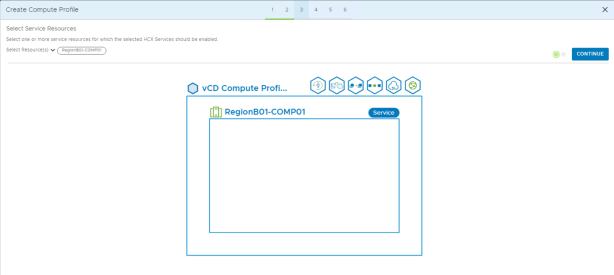
Choose what services will be provided in the destination/Cloud side, when your mouse hover over those icons, it will show the service detail description and in what format this service will be delivered (service or appliance).
Select resource where these appliances will be created under.
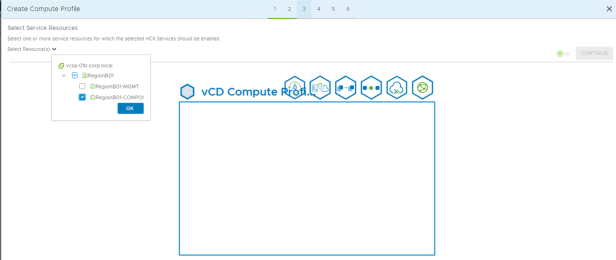
Select Resource Pool.
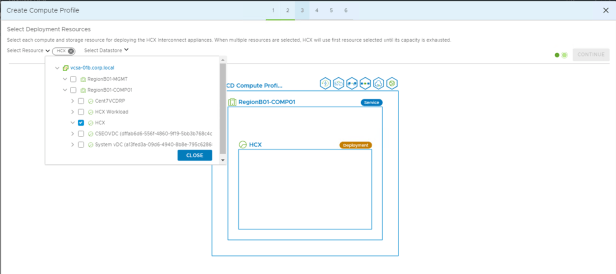
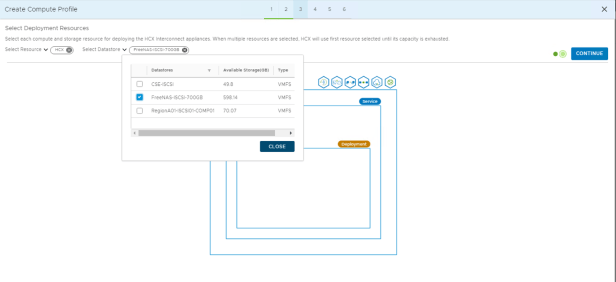
Select Datastore.
Create “Network Profile” for Management Network.
- Management Network
Select one or more network profiles such that one of the following is true:
The Interconnect Appliances on the remote site can be reached via this network
The remote side appliances can reach the local Interconnect Appliances via this network.
If you have point to point networks like Direct Connect which are not shared across multiple sites you can skip this step, since compute profiles are shared with multiple sites. In such cases Uplink network profiles can be overridden and specified during the creation of the Interconnect Service mesh.
- vMotion Network
Select the network profile via which the vMotion interface of the ESXi hosts can be reached. If you have not already defined such a network profile you can create it here. If you don’t have vMotion Network, select Management Network Profile.
This network can be isolated, don’t need to be reachable.
- Storage Network can use management network
Select a Network Profile via which the vSphere Replication interface of ESXi Hosts can be reached. In most of the cases this is the same as Management Network Profile.
- Extension Network
Select the Distributed Virtual Switches on which you have networks to which the Virtual Machines that will be migrated are connected.
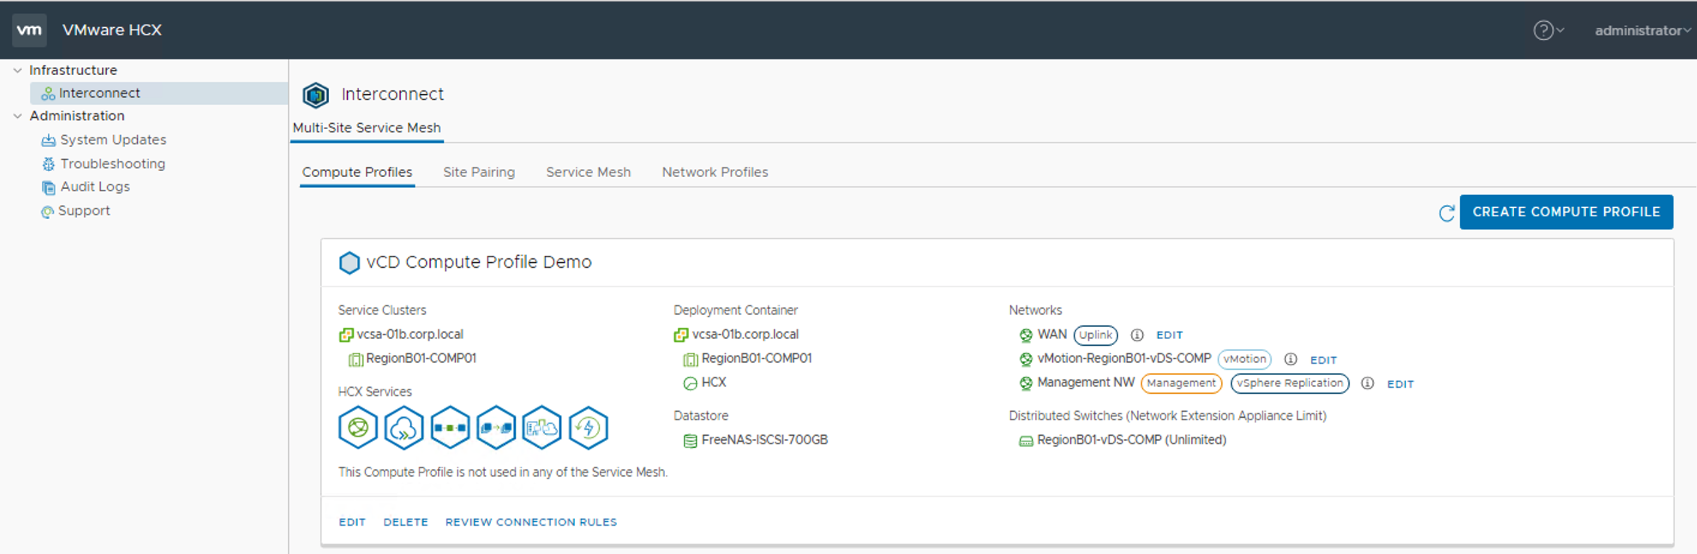
Review the vCD Compute Profile information.
The following info is the “COPY ALL” output example.
- [{“source”:”192.168.210.201-192.168.210.220″,”destination”:”192.168.210.22″,”services”:”TCP(443)”},
- {“source”:”192.168.210.201-192.168.210.220″,”destination”:”192.168.210.22″,”services”:”TCP(443)”},
- {“source”:”192.168.210.91″,”destination”:”192.168.210.201-192.168.210.220″,”services”:”TCP(9443)”},
- {“source”:”192.168.210.91″,”destination”:”192.168.210.22″,”services”:”TCP(443)”},
- {“source”:”192.168.210.91″,”destination”:”192.168.210.201-192.168.210.220″,”services”:”TCP(443)”},
- {“source”:”ANY”,”destination”:”192.168.210.221-192.168.210.230″,”services”:”UDP(4500)”},
- {“source”:”ANY”,”destination”:”192.168.210.221-192.168.210.230″,”services”:”UDP(4500)”}]
Check the summary of this Compute Profile and click “CLOSE” button to finish the Compute Profile creation.

You can see Compute Profile detail information and can edit or delete it here, this completes the installation of HCX Cloud in the vCloud Director side and is ready to be paired up with their tenant HCX Enterprise!
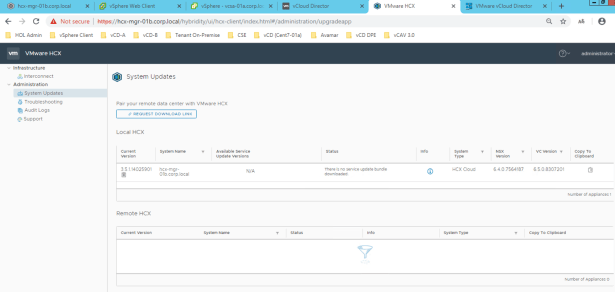
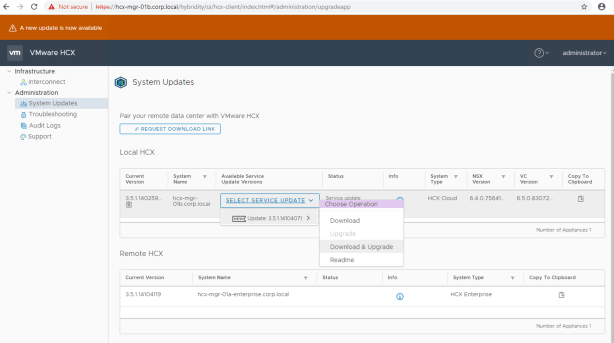
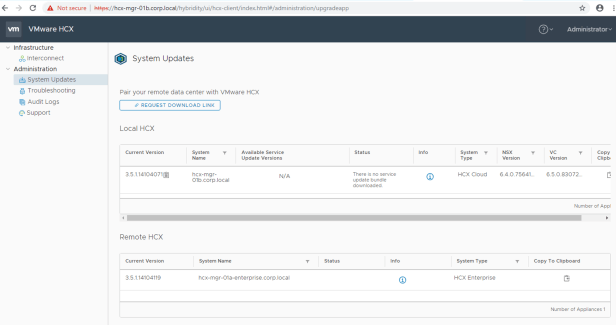
On a side note that if you see a warning bar saying there’s a new update available and you want to update the HCX Cloud Manager, it’s quite easy, you can just go to:
Administration –> System Updates –> Available Service Update Versions, choose “Download & Update” operation task to update the appliance to the latest version!
Now the system has been updated to the latest version.
I hope this blog can help you understand better with regards to the overall HCX Cloud and vCloud Director integration and installation steps involved, thanks!
Notes:
- Details installation procedures can be found here.
- As of the blog is published, the latest HCX versions are as the following:
- HCX Enterprise: 3.5.1-14104119
- HCX Cloud: 3.5.1-14104071
- HCX Cloud OVA: VMware-HCX-Cloud-3.5.1-14104071.ova
